Looking back over the past 6 weeks, i believe that our group has struggled to work well together. It seemed to be lack of communication from other group members which made things extremely difficult to get done. In order to help this we decided to create a joint "DropBox" account where we can all upload files so that we could get immediate feedback from each other. Also to aid the communication between us as a group I took created a Facebook thread, this made easier to keep in touch. We had lost contact with 2 particular group members for a couple of weeks at one point and realised that the remaining 3 of us would have to get their share of the project completed. Shortly as we started to do so, we heard from the other members. This was not ideal. Since then everyone had been attending lectures and cracking on with their work. This did not change my opinion of certain member not pulling thier weight for the project though.
From the gantt chart its possible to see who did what activity and when. I felt that this was a very good way of keeping to a structure and sticking to deadlines!
The final animation i am extremely pleased with. During our presentation we recieved great feedback from both Elli and tutors, this made me personally feel like i had achieved what had been asked of me and the group. This does go to show that if the other members of the group pulled their weight we would have been able to produce something much, much better.
Friday, 10 December 2010
Evaluation of Project Head
Reflecting back on my mark i previously received i was happy with that, as i was expecting something of a lower score. With the model now improved i feel that i could potentially reach i score i would be extremely happy with.
What went well and what didnt go well?
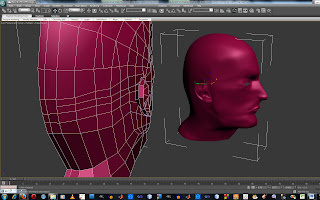
As previously said i was covering ground very quickly, until i accidently grouped all the modifiers together and ended up with a head that was turbosmoothed and symetrical. This was not ideal as this task required completing work on only one half of the face. This understandably prolonged my speed at which to complete the project. This made texturing rushed and not completed to satisfactory level by my standard.
Overall i feel that the ear is looking extremely good now it has been recreated. Also the Unwrap UVW modifier worked very well. This is an area which needs time spent carefully on it, although this was made even longer by grouping the model together. Ideally i would have liked the head to have looked more realistic, but i still believe it is possible to realise it is me...so thats a plus side i guess :)
What went well and what didnt go well?
As previously said i was covering ground very quickly, until i accidently grouped all the modifiers together and ended up with a head that was turbosmoothed and symetrical. This was not ideal as this task required completing work on only one half of the face. This understandably prolonged my speed at which to complete the project. This made texturing rushed and not completed to satisfactory level by my standard.
Overall i feel that the ear is looking extremely good now it has been recreated. Also the Unwrap UVW modifier worked very well. This is an area which needs time spent carefully on it, although this was made even longer by grouping the model together. Ideally i would have liked the head to have looked more realistic, but i still believe it is possible to realise it is me...so thats a plus side i guess :)
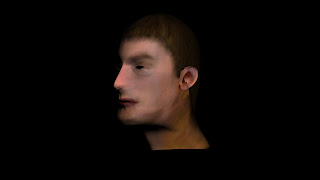
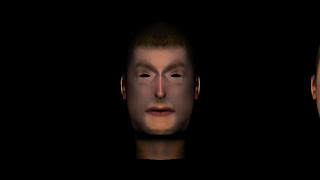
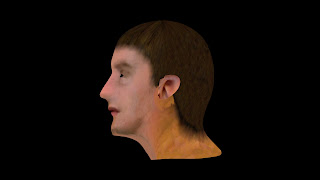
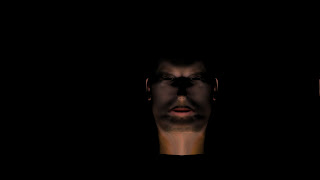
Final renders of my model
With the ear now attached i had to completely re do the material texture for my head. I was not completely happy with the outcome, as i made a massive mistake when modelling. I accidently grouped everything together on the original model and was un able to re open the previous model. This made editing, aminating and creating the texture extremely difficult.
I have used an omni light in a couple of the photos to give the render another effect. As you can see the texture over the ear is not the greatest, but still this is an improvment on the previous model as i was able to attach it this time.
I have used an omni light in a couple of the photos to give the render another effect. As you can see the texture over the ear is not the greatest, but still this is an improvment on the previous model as i was able to attach it this time.


Wednesday, 8 December 2010
Amendments to the head
When previously modelling my head i had able to attach the ear to the model. Now i have been able to do this the result make the model look so much better.
I re-do the topology for the ear. This time i counted out the amount of sides i had to fit the ear to the head. In this case it was 12, I was able to use this number and create 12 edges over my ear topology. Once the ear had been created in the same way that the head had been (using the line tool, and welding the verticies together) I then had the tricky task of joining it to the head. As the snap tool was bugging out, i had to roughly match up the verticies i wanted to weld together by freehand.
With quite a bit of time used manipulating the ear and joining up the verticies, i feel that is was worth it. This feature adds so much more realism to the look of the model.

Friday, 3 December 2010
Rendering and outputs
The final animation will be rendered in HD (720p). The following specification is what we have decided to use:
What did I have to render?
As we have 5 members of the group we decided to split up the animating and rendering between us. I decided to animate and render the follwing scenes:
What are the next steps to take?
Once all the group members have got their movies created we will be able to put them all into Adobe PremierPro and then we can start to edit each scene and create our final product, which will be shown to Ellie Constantatou on Wednesday 8th December.
- Width - 1280
- Height - 720
- AVI Video Clip
- Uncompressed & Compressed format
What did I have to render?
As we have 5 members of the group we decided to split up the animating and rendering between us. I decided to animate and render the follwing scenes:
- Opening scene
- Paintballing scene
- Zipline scene
- Ending scene
What are the next steps to take?
Once all the group members have got their movies created we will be able to put them all into Adobe PremierPro and then we can start to edit each scene and create our final product, which will be shown to Ellie Constantatou on Wednesday 8th December.
Wednesday, 1 December 2010
SuperSpray

In order to create the paint balling scene (that would be filmed in first person) I had to think of a way to manipulate this using a white background. I came across the idea of creating mist from the humans mouth. Using this technique along with heavy breathing, and other sound effects it would create a very good representation.
As I had no previous experience of creating mist I searched the Internet for tutorials until finally I found one for cigarette smoke. I used this up to a point where I needed to change the values to suit myself.
Wind and drag modifiers were added to give realism and direction to the mist. As you can see from the screen shot above, there are many bursts of mist (one for each breath). Initially it was difficult to select an appropriate particle count, but after trial and error within the render area I was able to select a count of approx 90. Looking at the screen shot below the sections outlined in red are the one that have a noticable affect when their values change.

I am adamant that this scene was the hardest to create, but I am also very pleased with the outcome of it. One reason being because I have learnt an extremely useful technique which i can take on to further development in the future.
I also added in paint balls coming from behind the person, this adds to the environment that is being portrayed to the audience.
Sunday, 28 November 2010
Animating the first scene

Looking at the gantt chart it was up to me to complete the animation for the opening scene. This was a fairly simple procedure as it was a case of getting the timings right for the trees popping up, the text dropping from the sky and the camera.
The screen shot shows that i have used the curve editor in order to create a realistic falling affect for the text. I also added a squashing effect of the text when it hits the ground, it then expands once the built up energy has been released.
The next step for me would be to create the kayak scene, for this i will use the rigged person.
Subscribe to:
Comments (Atom)